OANDA Desktop Trading: user preferences settings
To set up user preferences for your OANDA Desktop Trading program, click on Tools and then click on User Preferences. The window has seven tabs:
- Chart Tab
- Rates Tab
- Periods Tab
- Trading Tab
- Locale Tab
- Sounds Tab
- MISC Tab
You can return all preferences to their default size/settings by clicking the Restore Defaults button. This feature is available on every tab. If you click this button and want to return to your customized settings, restart the program.
 Chart Tab
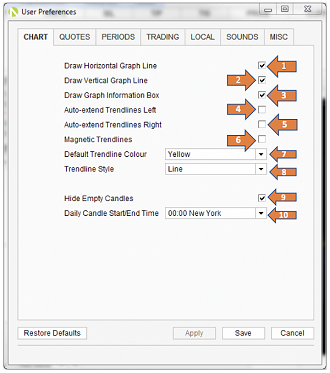
The Chart tab lets you customize your chart features. Below are some of the things you are able to customize. Follow the numbered chart and corresponding image below to locate your desired feature.
- Check the Draw Horizontal Graph Line box to show a horizontal crosshair running across the chart area at the cursor location.
- Check the Draw Vertical Graph Line box to show a vertical crosshair running across the chart area at the cursor location.
- Check the Draw Graph Information box to show detailed rate information in the bottom-left corner of the graph for the time at the cursor location. This information varies with the type of graph you've selected.
- Check the Auto-extend Trendlines Left box to extend trendlines from the beginning of the graph to the left of the graph. For information on trendlines, see drawing trendlines.
- Check the Auto-extend Trendlines Right box to extend trendlines from the beginning to the right of the graph. For information on trendlines, see drawing trendlines.
- Check the Magnetic Trendlines box to automatically snap trendlines to the exchange rate curve in the graph.
- Click on the drop-down menu next to Default Trendline Colour to set the style(s) of your trendline (i.e. dotted line, solid line, etc.).
- Click on the drop-down menu next to Choose Trendline Style to show detailed rate information in the bottom-left corner of the graph for the time at the cursor location. This information will vary based on the type of graph
- Check the Hide Empty Candles box to ignore empty candlesticks when calculating overlay/indicator data
- Click on the drop-down menu next to Daily Candle Start/End Time to choose the daily time of day at which candlesticks start and end.
Rates Tab
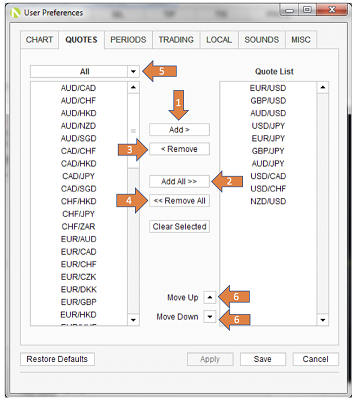
The rates tab lets you specify which currency pairs and commodities are visible on your OANDA interface.
The pairs and pair order shown in the ‘quote list’ on the right side reflect what will appear in the OANDA interface.
- To add currencies to the OANDA interface, select the currency from the list on the left. Click on Add to bring the currency to the ‘quotes list’ on the right.
- To add all currencies, click Add All.
- To remove currencies from the OANDA interface, select the currency from the ‘quote list’ on the right and click Remove.
- To remove all currencies and start again, click Remove all.
- To add or remove commodities or CFDs (not available in the United States), change the pulldown menu located above the list on the left from A ll to CFD .
- To change the order in which currency pairs are displayed on the Quote list , select each currency pair you want to move, for example EUR/USD , and then click the arrows next to Move Up or Move Down to change their position on the list.
Periods Tab
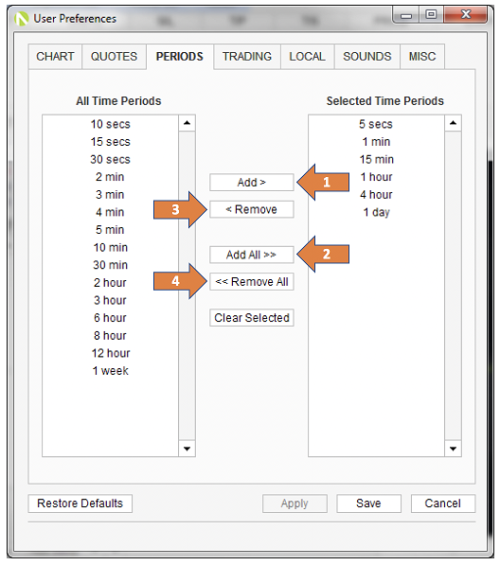
The Periods tab lets you set the desired timeframes available on the program. For example, if you wish to trade on daily charts, you can add the ‘1 day’ option to the ‘Selected Time Periods’ list.
- To set your selected time periods, choose your desired time periods from the list of A ll Time Periods located on the left and click Add to add them to your ‘selected periods list’.
- To add all time periods, click Add All .
- To remove time periods from your ‘selected time periods’ list on the right, select your desired length of time and click Remove
- To remove all time periods and start again, click Remove All
Trading Tab
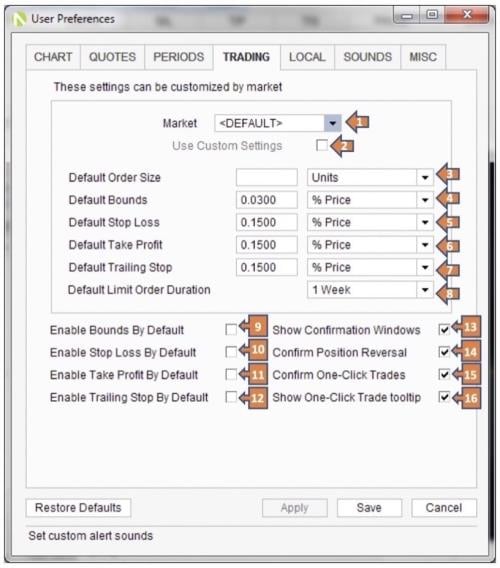
The trading tab lets you change the default parameters that appear when you're making a trade.
Change trading settings for individual instruments
The following settings can be applied to individual instruments (if you select an instrument and click the Use Custom Settings box) or all instruments:
- Market: choose an instrument from this list box if you want to use custom settings for that specific instrument. Leave "DEFAULT" selected if you want the settings to apply to all instruments.
- Use Custom Settings: check this box if you want the settings to apply to the instrument that you selected from the Market list box (this box is greyed out if the DEFAULT market is selected). After you customize settings for a particular instrument, you can toggle between those settings and the default settings by clicking this check box on and off.
-
Default OrderAn instruction to buy or sell an instrument under the specified conditions Size:
this feature allows you to set the default order size used in any "Units" field (when placing a market order for example). Use the pulldown menu beside this field to set the default number of units or the amount of account currency, or the percentage of units available to trade.
- Default bounds: the default value that appears in the bounds fields of the Buy/Sell window. Choose from pips, a percentage, or a monetary amount.
- Default stop loss: the default value that appears in the Stop Loss field. Choose from pips, a percentage, or a monetary amount.
- Default take profit: the default value that appears in the Take Profit field. Choose from pips, a percentage, or a monetary amount.
- Default trailing stop: determines the default amount and units (pips, price, a set amount of the home currency, or a percentage of price, balance, or NAV) for trailing stops.
- Default limit order duration: by default, entry order expires after one week. Instead, you can set the default expiry period to a selected number of hours, days, or even a month.
Global trading settings - the following settings apply to all currency pairs:
-
Enable bounds by default: automatically enables and populates the bounds fields in the order window with the default bounds.
-
Enable stop loss by default: automatically enables and populates the stop loss field in the order window with the default stop loss.
-
Enable take profit by default: automatically enables and populates the take profit field in the order window with the default take profit.
-
Enable trailing stop by default: enables the trailing stop and uses the default trailing stop values every time the entry order and market order windows are opened, or for any one-click trades.
-
Show confirmation windows: click if you want to see windows asking you to confirm your action after you buy, sell, close, or modify a trade order.
Confirm position reversal: notifies you if a position is being reduced, closed, or reversed by a new trade. This notification will be issued even if confirmation windows are disabled.
-
Confirm one-click trades: when checked, provides a confirmation window for one-click trades that you make from the quote panel.
-
Show one-click trades tooltips: when checked, displays a tooltip window of trade details when you hover the mouse over any quote panel.
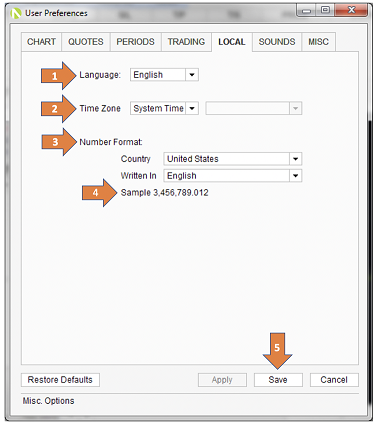
Locale Tab
The Locale tab lets you choose settings related to your language and geographic location.
- Select your desired Language from the drop-down list to change the text on your OANDA account to a different language.
- To set your time zone, click on the drop-down Time Zone menu. By default , the time zone matches the one set in your computer's operating system. Please note, because some regions use daylight saving time at different times of the year, you also need to select your geographic area to ensure the system tracks these time changes.
- Numbers are written in varying formats around the world. To change the number format shown in the OANDA interface, choose your country from the drop-down list right of Country . Next select the language the numbers will be written in, by selecting the drop-down menu right of Written In . Please note: only official and most commonly used languages spoken in the country are shown.
- A Sample number will appear that will show you the specific format of the numbers.
- Click Save when you are done setting your local preferences.
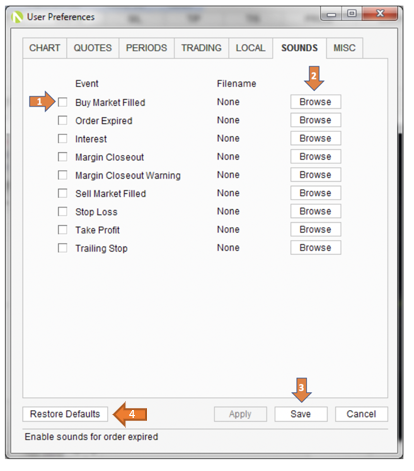
Sounds Tab
The Sounds tab lets you add your own sound alerts for various events.
- To do this, first check the box beside the event to which you wish to add a sound alert, such as Buy Market Filled .
- Next click Browse to locate a sound file to associate with that event on your computer. You can use any AIFF, Au, MIDI, or WAV file located on your computer.
- Finally click Save to set your sound preferences.
- You can also Restore Defaults and start again if you want to revert it to the original settings. The restore default button is located in the bottom left hand corner.
MISC Tab
The MISC tab lets you choose various miscellaneous settings.
-
Clicking
Show Dual BidThe prevailing buy price./AskThe prevailing sell price. Columns
shows the bid and ask prices in separate columns in the rates list. When not checked, the last three digits of the ask price are shown after the bid price in the same column (for example 1.56950/959).
- Clicking the Colour Coded Tables shows pipettes or fractional pips in the tables, graphs, and current rate displays. If pipettes are hidden, the rates are rounded to the nearest pip for display purposes.
- Clicking Full Word Filter sets the table filter to search for whole words only.
- Clicking Auto Save Profile allows the system to save profile changes automatically.
- Clicking Show Pipettes displays the full price rates to the pipette (5th decimal place) level if enabled or rounds to pip (4th decimal place) level if disabled.
- Clicking Sort Sub Accounts orders sub-accounts alphabetically. When not checked, sub-accounts are typically ordered by creation date. Please note, this order appears in both menus and the sub-account switcher.
- You can set which sub-account is set as your Default Account by using the drop-down menu right of Default Account .
- You can lock your OANDA Desktop Trading screen after a certain number of minutes by entering a value into the field right of Lock Screen After . Use a value of zero ‘0’ if you want to disable screen locking.
- Click Save once you are ready to save your preferences.
