MetaTrader 4, or MT4 for short, is a third-party trading platform developed by MetaQuotes Software Corp in 2005. If you experience trouble using the MT4 platform or cannot log in, refer to our MT4 troubleshooting FAQ page. For further instructions on how to use MT4, refer to the official platform user guide on the MetaTrader 4 website .
The topics below will show you how to use the MT4 trading platform:
 Create an account
To use the MT4 platform you will first need to have an account with OANDA. If you don’t have a live trading account and are interested in contracting one, you can do so via our website .
 Download MT4
To download an .exe install file of MT4 for your Windows computer, click here .
- System requirements and platform compatibility
- How to install MT4 on Mac computers
System requirements and platform compatibility
Below are the system requirements for using the MT4 platform:


If you do not have access to Google Play and wish to download the MT4 APK file for Android, click here .
How to install MT4 on Mac computers
Please refer to the official guide on how to install MT4 on Mac computers, written by MetaQuotes Software Corp.
 Log in to the MT4 platform
 MT4 desktop
To log in to the OANDAMT4 platform, follow these instructions:
-
Open the OANDAMT4 platform.
-
Click on File located in the top left corner of the platform.
-
Click on Login to Trade
 The actual execution of buying or selling an asset, resulting in a completed transaction. Account.
 -
Enter your login, password and assigned server.
- The login ID and server information are available in the HUB. Refer to this guide.
- If you don't remember your MT4 password, you may reset the password from the HUB.
-
Click on Login.
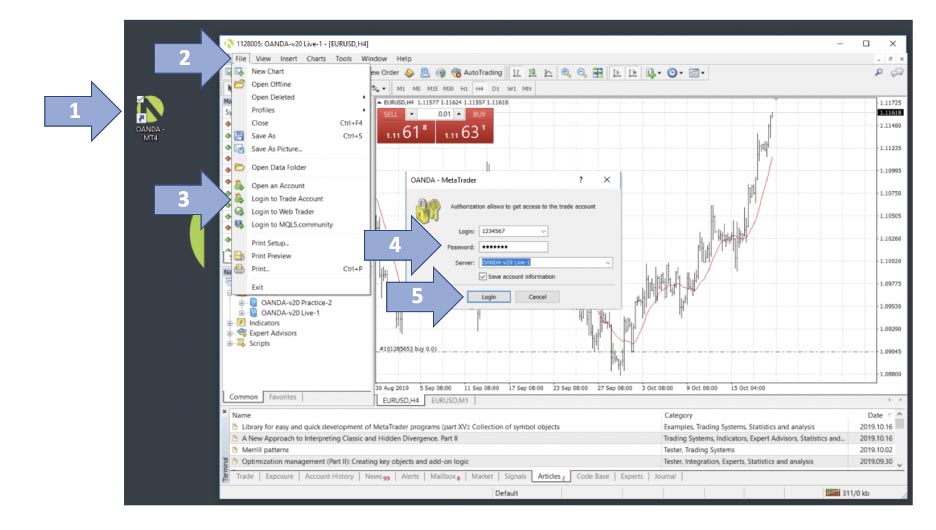
-
For the login process after activating the mandatory two-factor authentication (2FA), refer to this topic.
 MT4 mobile app
-
Tap on the 3 horizontal lines icon at the top left.
-
Tap on Get started.
-
Tap on the plus icon.
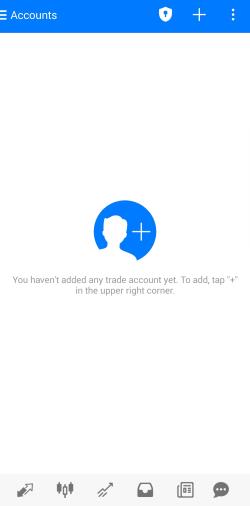
-
Tap on LOGIN TO AN EXISTING ACCOUNT.
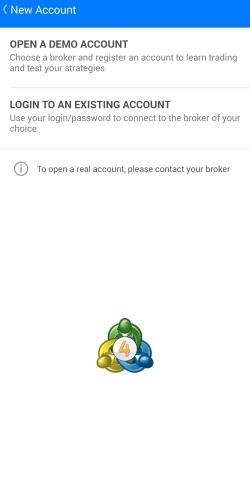
-
Type OANDA.
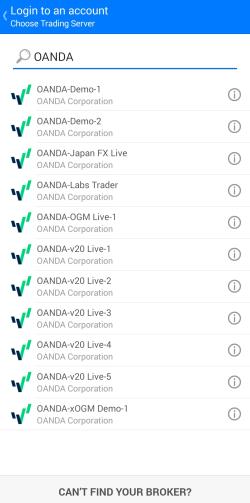
-
Tap on your account’s server.
-
Enter your MT4 login ID and password.
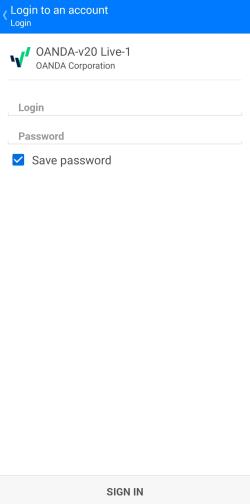
-
Tap on SIGN IN at the bottom.
 How do I add additional MT4 sub-accounts?
To add additional sub-accounts, follow this guide.
 Investor password
MT4 allows the client to grant read-only access to other users via the creation of an Investor password.
When someone uses the Investor password to log in to an MT4 account, they can only view account activities and history, but they cannot enter or modify any orders nor make changes to the account.
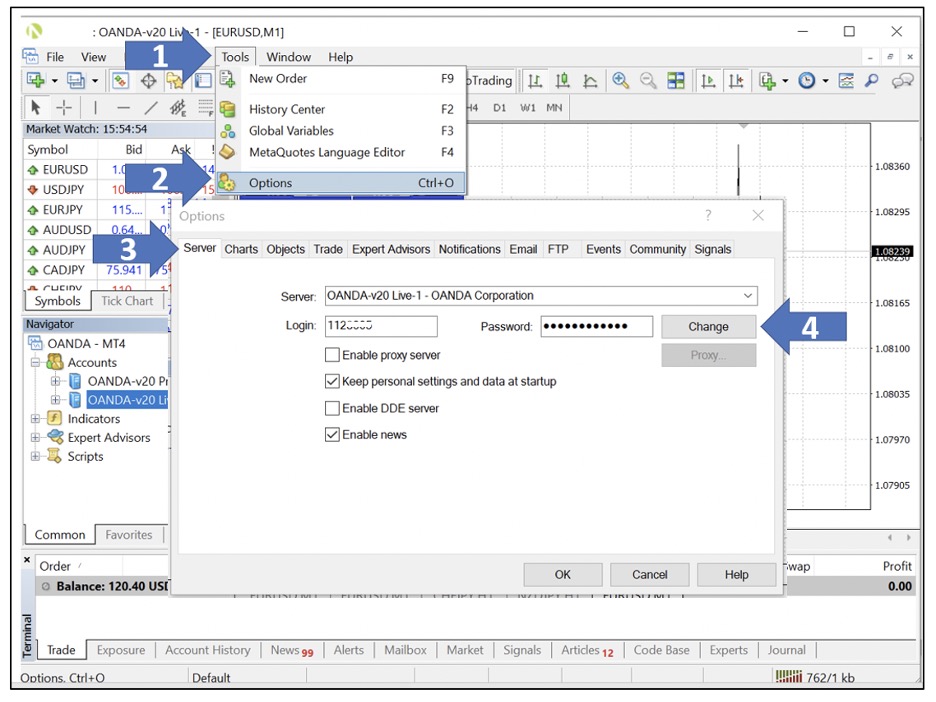
Follow the steps below to create an investor password:
1. Click on Tools
2. Click on Options
3. Click on the Server tab
4. Click on the Change button.
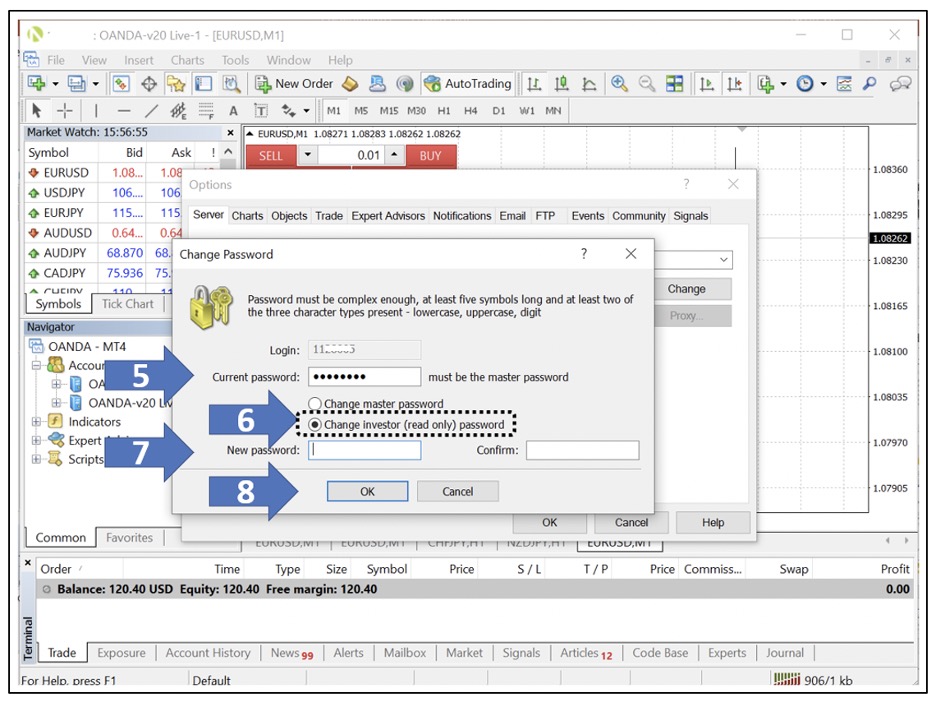
5. Enter your MT4 account password
6. Select Change Investor (read only) password
7. On the New password and the Confirm fields, enter the desired investor password twice
8. Click OK to complete the Investor password setup.
 Open a position
To open a position via a trade ticket, follow the instructions below:
1. Go to the Market Watch located on the left side of the platform
2. Right click on the instrument you want to trade
3. Click New Order![]() An instruction to buy or sell an instrument under the specified conditions to open a trade ticket
An instruction to buy or sell an instrument under the specified conditions to open a trade ticket
4. Set the conditions of the trade. Complete the trade by clicking on Sell by Market or Buy by Market.
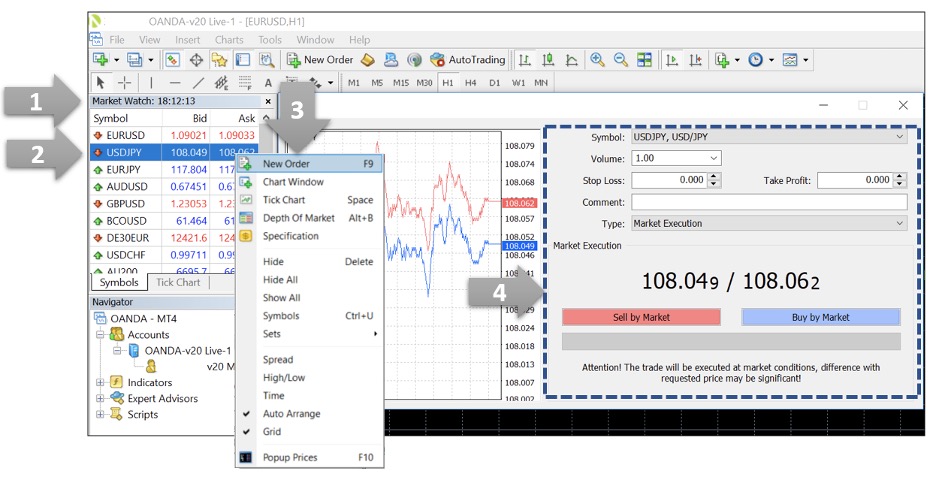
Below is a breakdown of what each section of the above trade ticket contains:
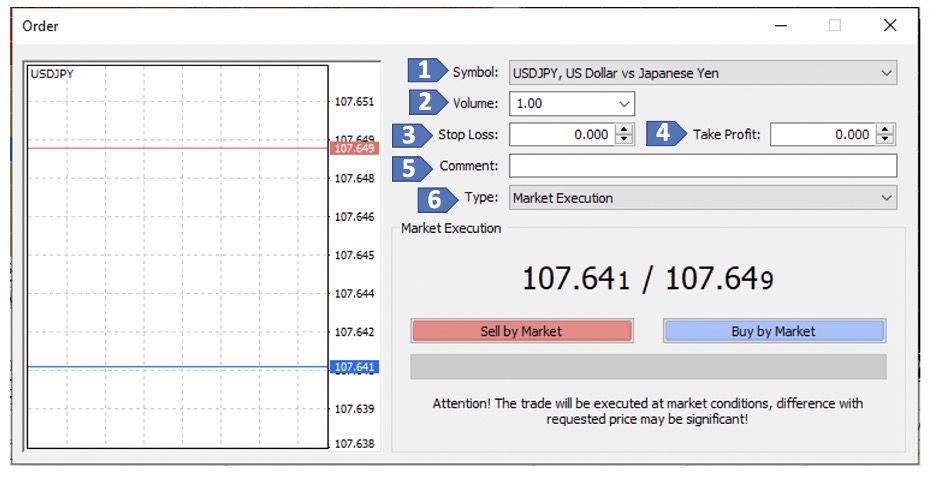
1. Symbol: choose which instrument you’d like to trade
2. Volume: choose the volume or amount you’d like to trade.
3. Stop Loss: sets a stop to close a trade at a predetermined price if the price moves against you. Stop Losses are however, susceptible to slippage.
4. Take Profit: locks in profits at a predetermined price if the price moves in your favour. Take Profits are however, susceptible to slippage.
5. Comment: leave a comment about a specific trade. Some traders use this feature to help manage their trades.
6. Type: select the type of order you’d like. Choosing Market Execution allows you to place the trade immediately after you click Sell by market or Buy by market. Alternatively, Pending Order allows you to choose the price at which your trade is opened.
- Place a pending order
- Limitations for Stop Loss Order (SLO) margin relief for OANDA Asia Pacific clients only
- Limitations for Guaranteed Stop Loss Orders (GSLOs) for OANDA Asia Pacific clients only
Place a pending order
A pending order is an instruction to buy or sell an instrument when certain preconditions are met. Below is a list of instructions on how to place a pending order as well as what each section of the trade ticket contains:
1. Go to the Market Watch window located on the left side of the platform
2. Right click on the instrument you want to trade
3. After clicking on New Order a trade ticket will open
4. Set the Type section to Pending Order.
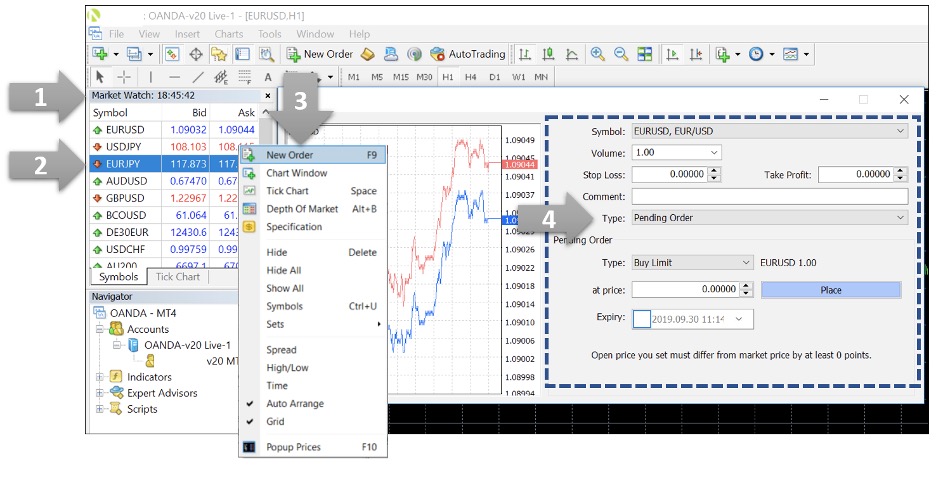
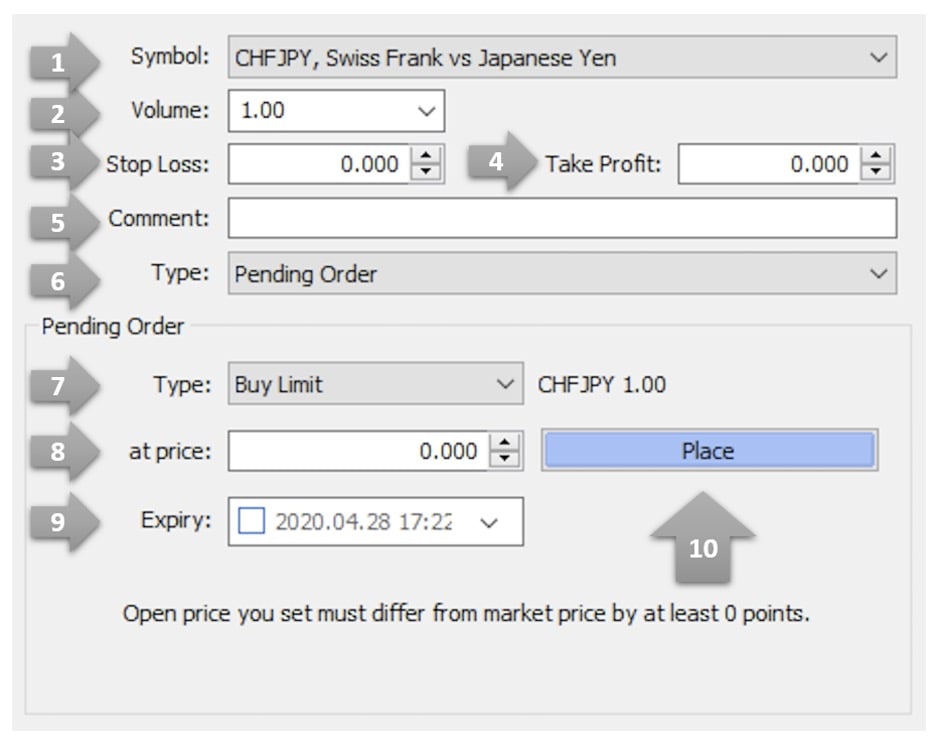
Below is a breakdown of what each section of the above trade ticket contains:
1. Symbol: choose which instrument you’d like to trade.
2. Volume: choose the volume or amount you’d like to trade.
3. Stop Loss: sets a stop to close a trade at a predetermined price if the price moves against you. Stop Losses are however, susceptible to slippage.
4. Take Profit: locks in profits at a predetermined price if the price moves in your favour. Take Profits are however, susceptible to slippage.
5. Comment: leave a comment about a specific trade. Some traders use this feature to help manage their trades.
6. Type: select the type of trade you’d like.
7. Type: the type of pending order you wish to place. The options include:
-
1) Buy limit: to enter a buy order at a price lower than the current market price
-
2) Buy stop: to enter a buy order at a price higher than the current market price
-
3) Sell limit: to enter a sell order at a price higher than the current market price
-
4) Sell stop: to enter a sell order at a price lower than the current market price
8. at price: the price at which you want the order to execute at
9. Expiry: time limit by which the order must be executed or it will be cancelled.
10. Place: place the order.
Limitations for Stop Loss Order (SLO) margin relief for OANDA Asia Pacific clients only
GSLO and SLO margin rates are either lower than or the same as standard margin rates. However, due to limitations on the MT4 platform, orders entered on MT4 to open a position with a stop loss attached will be charged the standard margin rates at first instance. After the order has been executed, the difference between the standard margin rates and the applicable GSLO/SLO margin rates will be taken into account, and the final revised margin requirements will be reflected accordingly.
In light of the above, there is a possibility for orders with a stop loss attached to be rejected on MT4 due to insufficient margin
Limitations for Guaranteed Stop Loss Orders (GSLOs) for OANDA Asia Pacific clients only
GSLOs cannot be attached to an order or position on MT4. Orders with a GSLO must be submitted via the OANDA platform instead. If an open position has a GSLO attached to it, this will appear within MT4 as a standard stop loss but will not be modifiable.
 Monitor and close your positions and pending orders
To close your positions and pending orders, follow the instructions below.
1. Select the Trade tab located at the bottom left of the Terminal
2. Right click on your order to see the order menu
3. Click on Close Order to finalise the closure
4. Alternatively, you can close a pending order or a current position by clicking on the small x located under Profit on the ‘Trade’ tab

 Customise MT4 charts
MT4 allows you to customise charts including drawing on charts with objects and adding indicators. Below we show you how to do both:
- How to draw on charts using objects
- How to add indicators to charts
How to draw on charts using objects
1. The first step is to locate the object toolbar which is located in the top left corner of the platform.

2. Next, draw on charts using objects by clicking on the object icon on the tool bar, and then click and drag to draw on the chart.
3. Click and drag the object to change its size and/or position. You can also right click on any object that opens a customisation menu. In this menu you are able to edit or delete objects.
The chart below has a list of the objects available on the MT4 platform:
| Object | Purpose | Image |
|---|---|---|
| Cursor | To select various objects in the chart. | x |
| Crosshair | To highlight coordinates of the selected point in the chart or indicator window. This mode can only work within the active chart window. Click and drag on an active chart whilst in “Crosshair" mode, to draw a line connecting two points. The distance between the points and the current price value will be highlighted to the right of the second point of the line. | x |
| Draw a vertical line | To draw a vertical line on your chart | x |
| Draw a horizontal line | To draw a horizontal line on your chart | x |
| Draw trendline | To draw a freehand trendline anywhere on your chart | x |
| Draw equidistant channel | To draw an equidistant channel | x |
| Draw Fibonacci retracement | To draw a Fibonacci retracement | x |
| Draw text | To add a comment into the chart. The comment will be anchored directly to the chart, and the text will move together with it when the chart is scrolled. | x |
| Draw text label | To add a text label. After this button has been pressed, one should select a point in the chart where the label should be placed. Unlike the ‘Draw text’ object, the “Draw text label” is attached to the chart window. When the chart is scrolled, the text label does not move. | x |
| Arrows | To manage, add or delete graphical symbols. | x |
How to add indicators to charts
Indicators allow you to analyse the chart and identify trading opportunities on the MT4 platform.
1. To add indicators, locate your chosen indicator from the Navigator window and drag it to the top of your chart.
2. Once the indicator has been placed on the chart, a window will open and allow you to set the parameters of how the indicator will function.
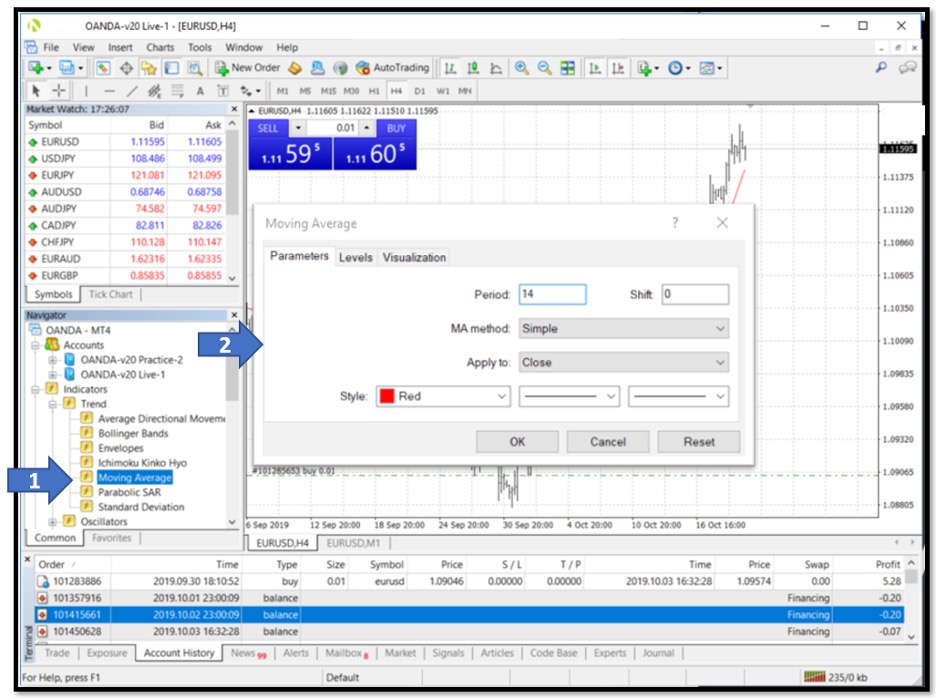
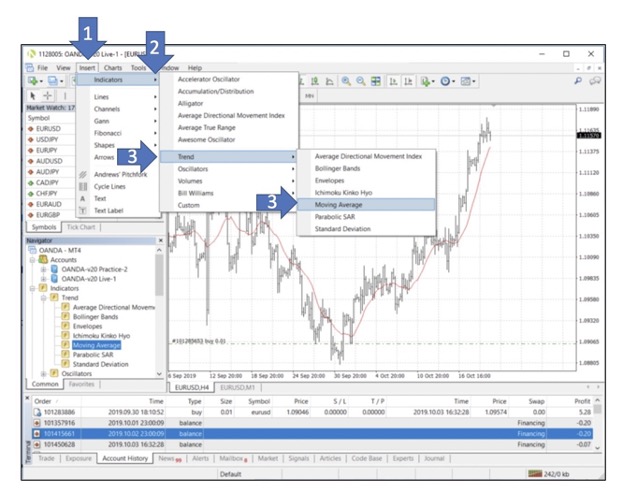
Another way to add the indicator to the price chart is by utilising the menu bar:
1. Click Insert
2. Choose Indicators
3. Select your preferred indicator from a dropdown list
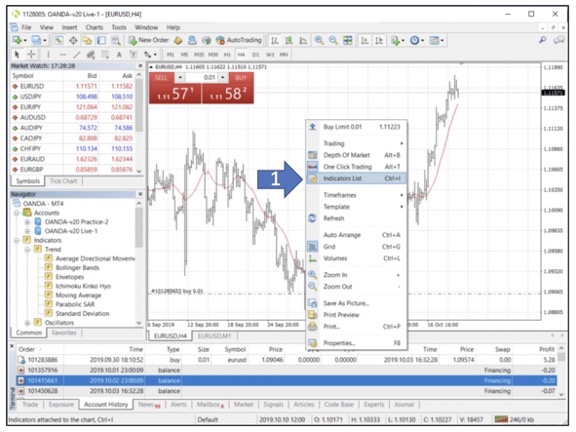
To edit or remove an indicator, begin by right clicking on the chart window. Next, follow the instructions below:
1. Click on Indicator list
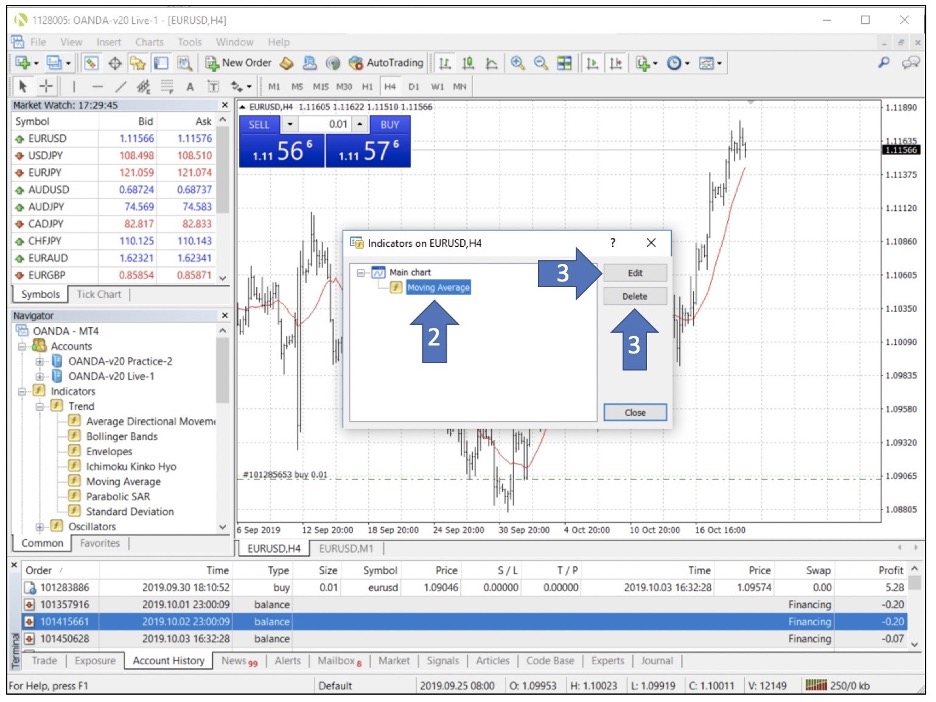
A window will appear that displays all active indicators on the chart
2. Select the indicator you wish to remove
3. Click Edit if you want to edit the indicator and Delete if you want to remove it
 Set up a price alert
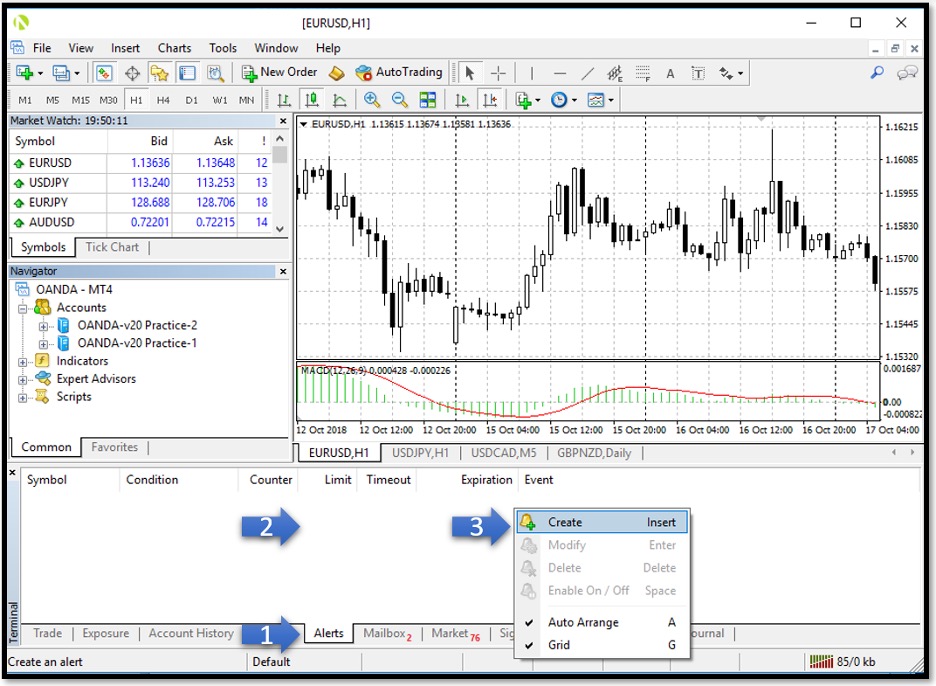
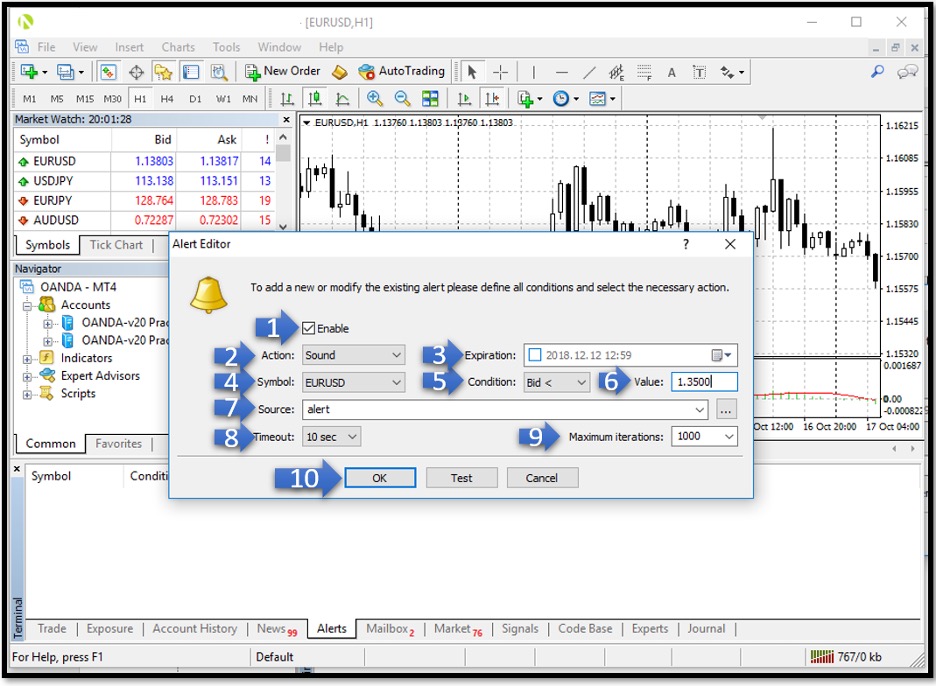
To set up a price alert for your MT4 desktop platform, please follow the instructions and corresponding images below:
1. At the bottom of the platform Terminal, click the Alerts tab
2. Right-click anywhere on the blank space in this section
3. Click Create to add a new price alert
Alert Editor options are explained in detail below:
1. Enable On/Off - allows you to enable/disable the alert. The alert will not be deleted when disabled.
2. Action - allows you to configure an action when an alert is triggered. These include:
- Sound - playing a sound file
- File - running an executable file
- Email - sending an email to an email address previously specified in your terminal settings
- Notification - sending a push notification to a mobile device . Sending push notifications requires specification of the MetaQuotes ID in the terminal settings.
3. Expiration - enables you to set a time limit for your price alert, after which the alert will be automatically deleted.
4. Symbol - specify the instrument.
5. Condition - determines the trigger criteria for the alert:
-
Bid
 The prevailing buy price.>
– the bid price is higher than the specified value. If the bid price exceeds the given value, the alert will trigger.
- Bid< – the bid price is lower than the specified value. If the bid price goes under the given value, the alert will trigger.
-
Ask
 The prevailing sell price.>
– the ask price is higher than the specified value. If the ask price exceeds the given value, the alert will trigger.
- Ask< – the ask price is lower than the specified value. If the ask price goes under the given value, the alert will trigger.
- Time= – time is equal to the given value. The alert will trigger after the amount of time specified.
6. Value - allows you to specify the trigger criteria value of the condition, such as the trigger price for an alert.
7. Source - depending on the type of action performed when your alert is triggered, one of the following is specified here:
- A sound file in *.wav, *.mp3 or *.wma
- An executable file in the *.exe, *.vbs or *.bat format
- Push message text. The maximum message length is 255 characters.
8. Timeout - allows you to set a break period between alerts, new triggers will not generate alerts within this timeframe.
9. Maximum iterations - allows you to specify the maximum amount of times an alert will repeat triggering.
10. Click OK to add the alert
 View your trade history
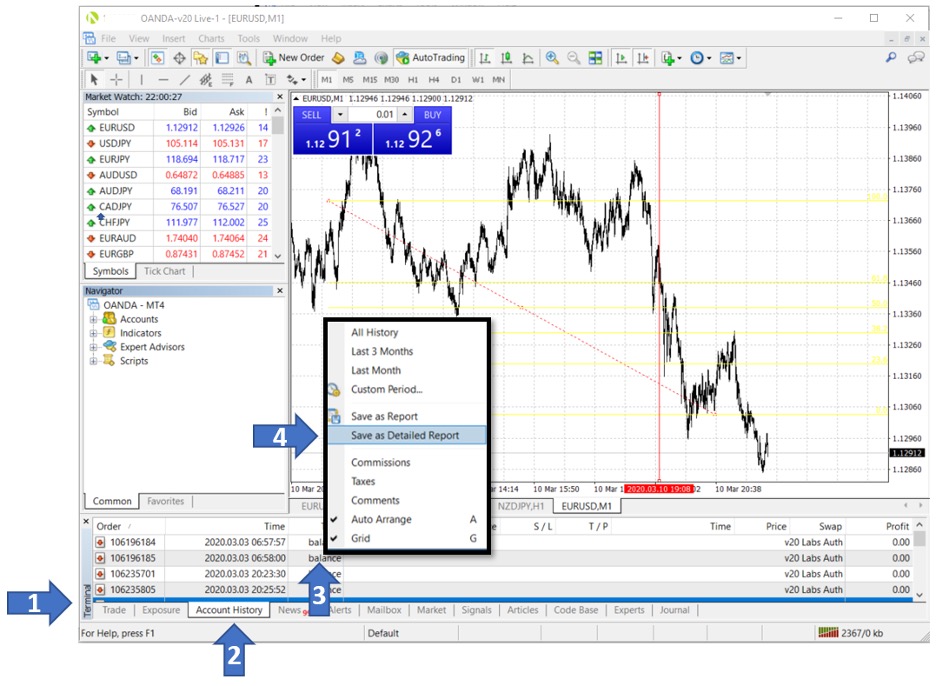
To review your trade history, begin by opening your Terminal window. Next, click on the Account history tab located at the bottom of the screen. If you are having trouble locating the trade right click anywhere in the window and select a time frame for your search; all history, the last three months, the last month or a custom search period.

 Download trade reports
Trade reports include information pertaining to:
- Closed trades
- Open trades
- Account summary
You can download both detailed and non-detailed trade reports. Detailed reports include the information outlines above as well as additional metrics such as drawdown and profit factor. To download a report, follow the instructions below:
1. Open the Terminal window
2. Click the Account History tab located along the bottom of the screen
3. Right click in the Account History window
4. Choose to Save as Report or Save as Detailed Report.
 How do I add more instruments to Market Watch window
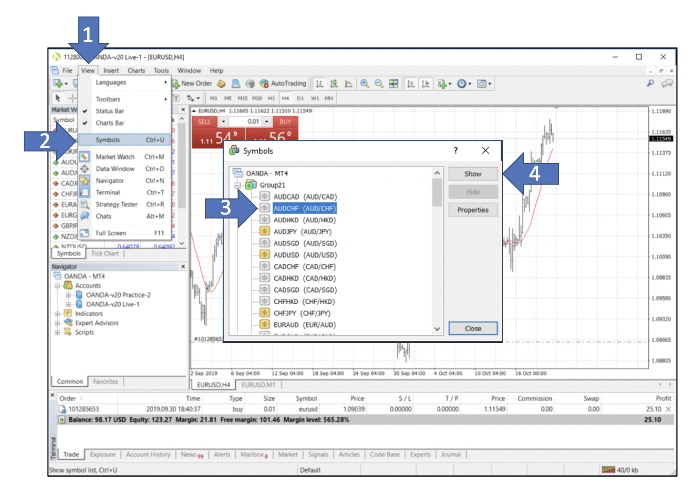
To add additional symbols, follow the instructions below:
1. Click on View
2. Click on Symbols
3. Select the instrument you wish to add. For example, AUDCHF (AUD/CHF)
4. Click Show to add it to your Market Watch.
 Using custom indicators
Custom indicators are technical indicators coded in MetaQuotes Language 4 (MQL4) to assist in the interpretation of price action and trends. Custom indicators can be created by the user or purchased from third party providers on the MT4 market .
Below are instructions to import a new custom indicator to your MT4:
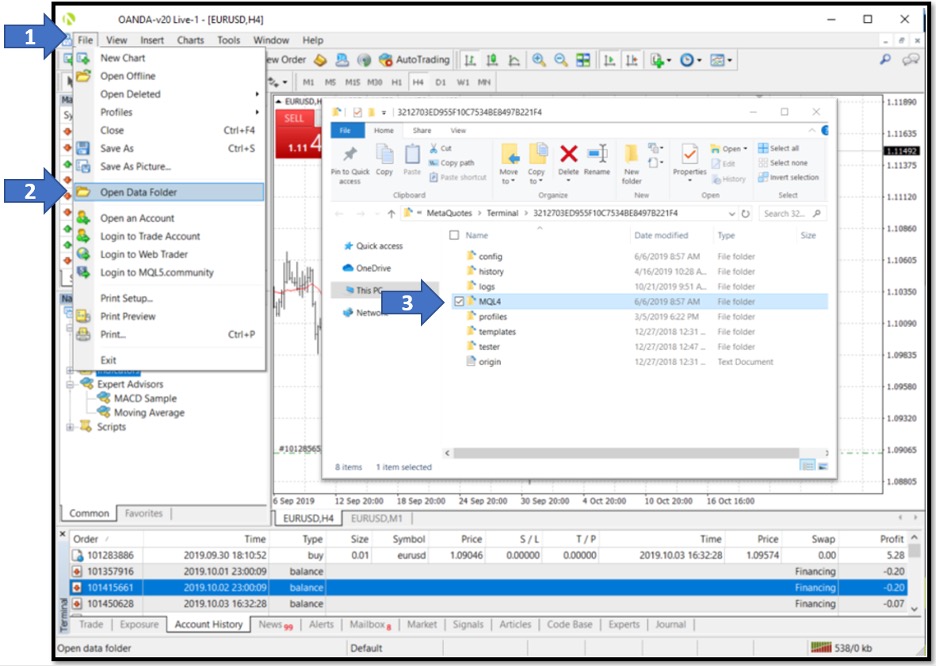
1. Click File
2. Click Open Data Folder
3. Double-click on MQL4 folder
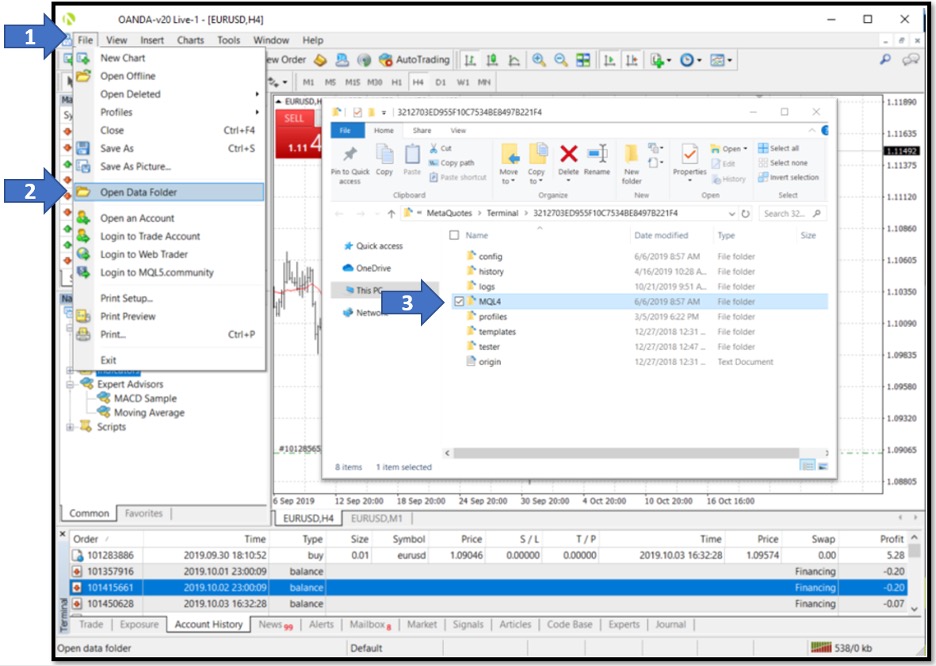
4. Double-click on Indicators folder
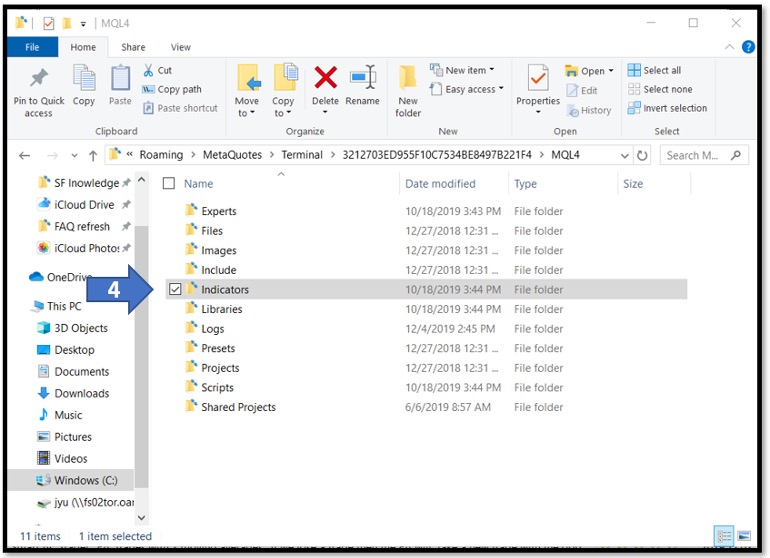
5. Paste or drag and drop your custom indicators file into the Indicators folder
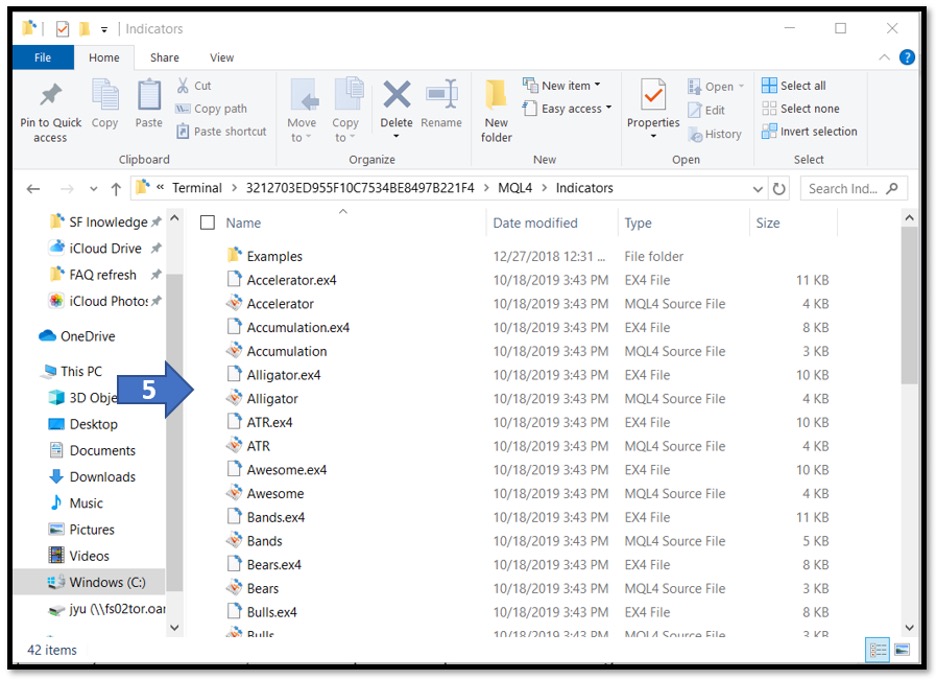
6. Close the data folder and restart your MT4 platform.
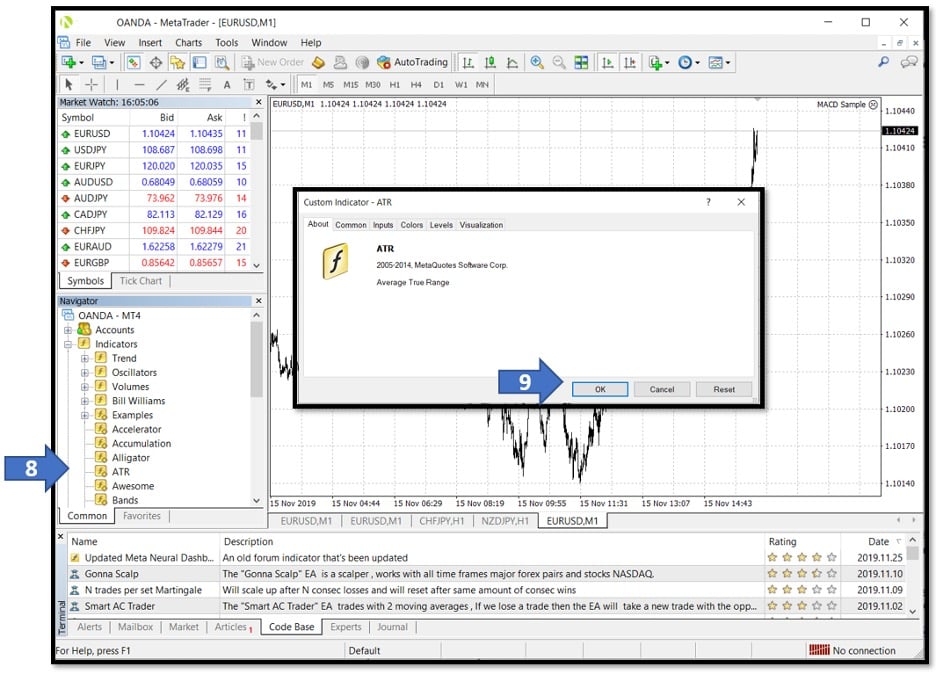
7. In Navigator, under Indicators, you should see your newly added custom indicator.
8. Double-click on the custom indicator to apply it to the current active chart or drag and drop it onto your desired chart. This will open the expert advisor's configuration window.
9. In the indicator’s parameter tab, set your desired values and click OK to add the custom indicator.
 Using Expert Advisors
Expert Advisors (EAs), or experts, are programs coded in MetaQuotes Language 4 (MQL4) to automatically place and manage trades for the user. EAs can be created by the user with programmable trading logics or purchased from third party providers on the MT4 market . Once enabled, EAs can monitor the market and trade for the user during market hours as long as the MT4 platform is running on a computer with a working internet connection.
Below are instructions to import a new EA to your MT4:
1. Click File
2. Click Open Data Folder
3. Double-click on MQL4 folder
4. Double-click on Experts folder
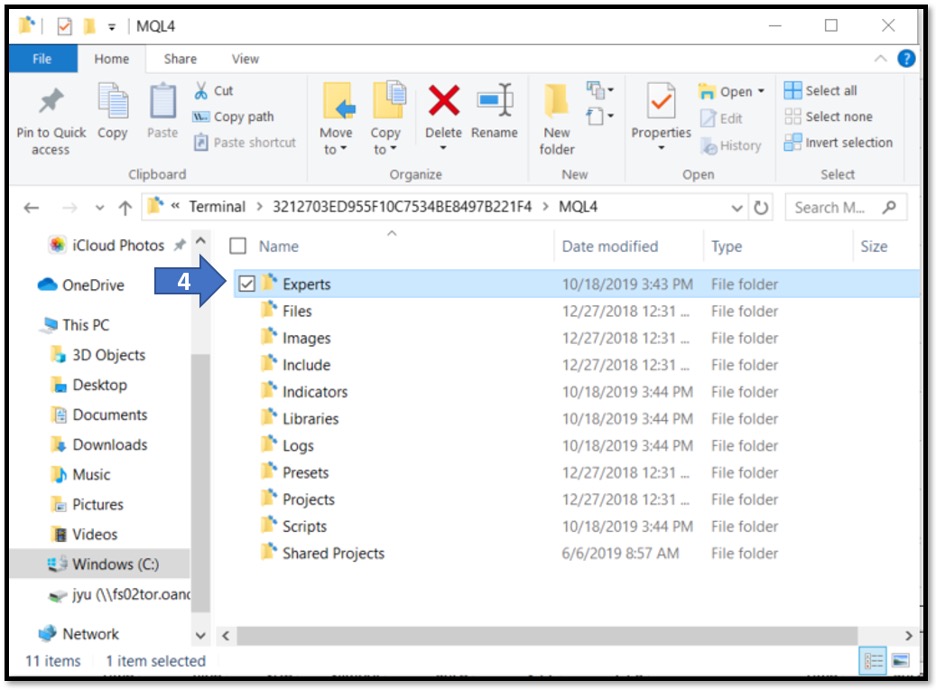
5. Paste or drag and drop your expert advisor file into the Experts folder
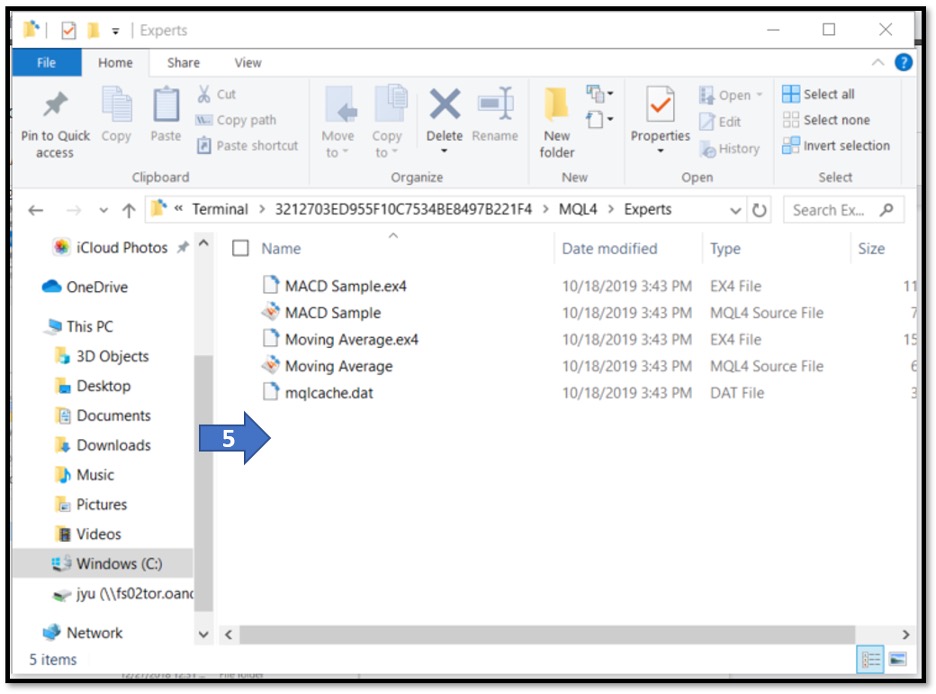
6. Close the data folder and restart your MT4 platform.
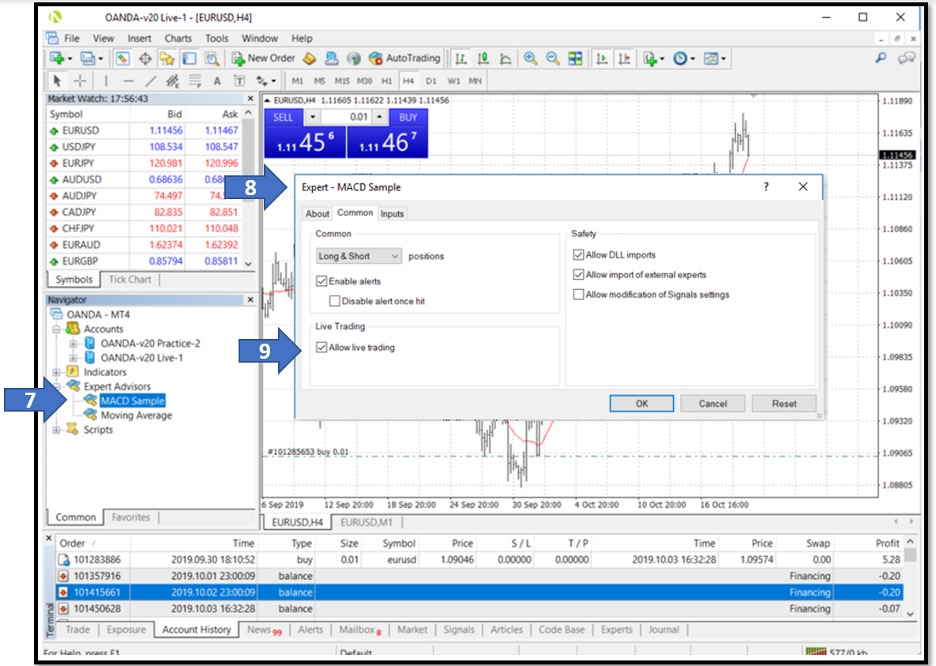
7. In Navigator, under Expert advisors, you should see your newly added expert advisor.
8. Double-click on the expert advisor to apply it to the current active chart or drag and drop it onto your desired chart, which will open the expert advisor's configuration window.
9. In the Commons tab, checkoff Allow live trading, and Allow DLL imports, click OK.
10. You should now see the name of the expert advisor, along with a smiley or frowning face at the top right corner of the chart.
10.1. A frowning face indicates the expert advisor is not currently active and will not make trades.
10.2. A smiley face indicates the expert advisor is currently active and will make trades according to its algorithm.
11. To enable the expert advisor and start auto trading, click on the Auto Trading button in the toolbar.
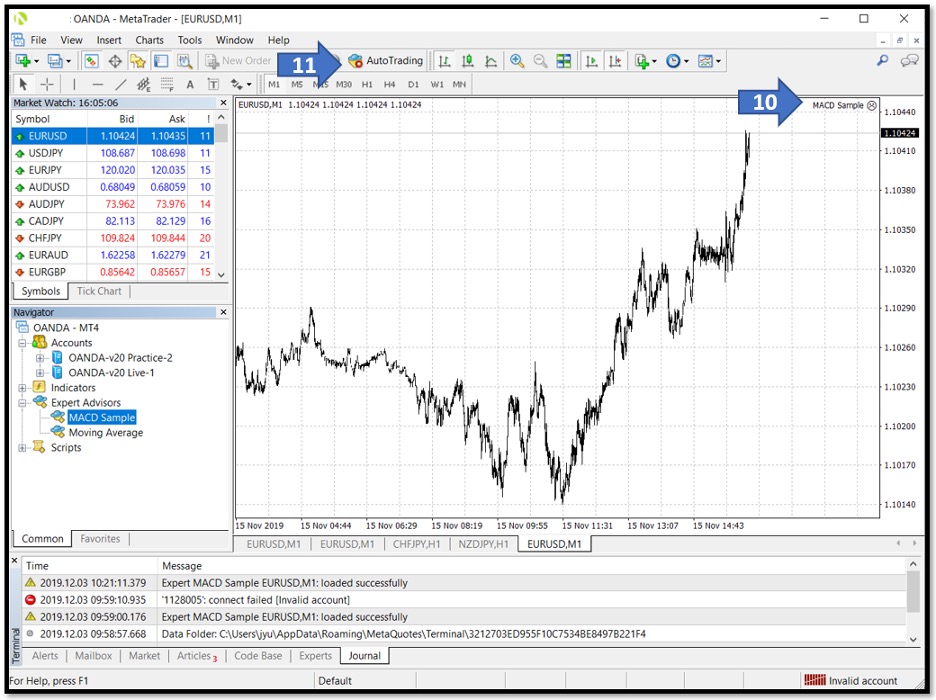
12. The Auto Trading with a red stop sign indicates expert advisors are not currently active. Click on it to start auto trading.
13. The Auto Trading with a green arrow sign indicates expert advisors are currently active. Click on it to stop auto trading.
 Install multiple instances of MT4 on your computer
To install multiple instances of the MT4 platform on your computer, complete the following steps:
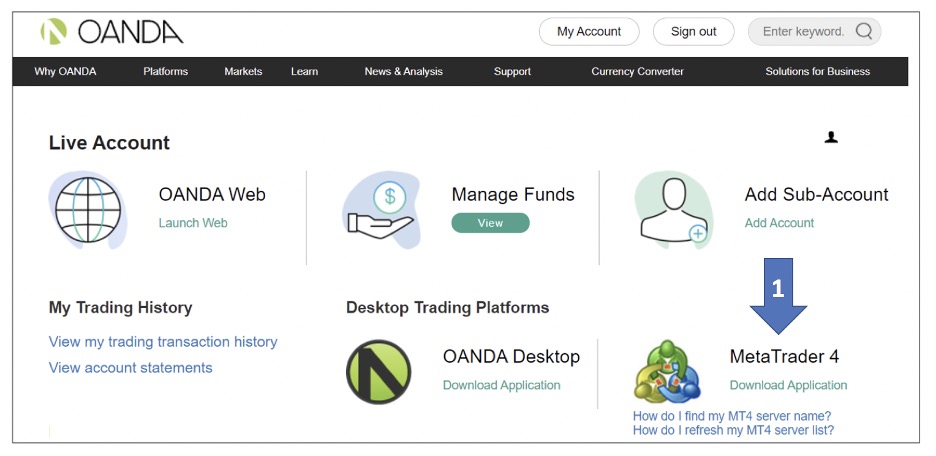
1. Download MT4 from our website
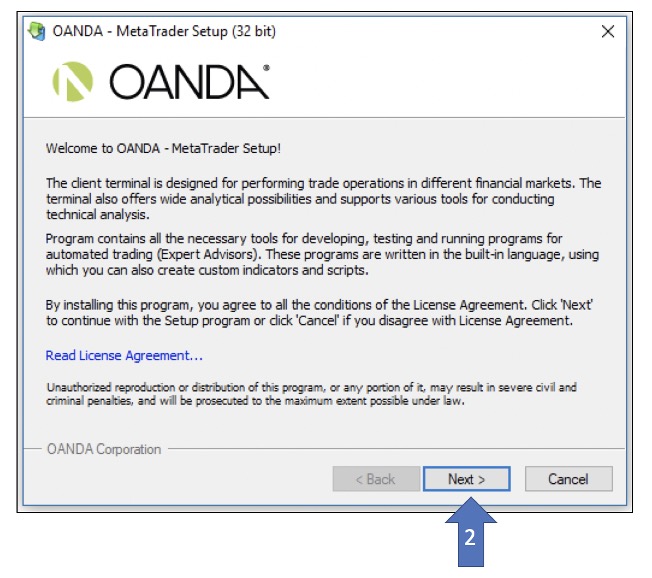
2. On the installation license agreement page, click Next
In the Installation folder and Program group fields, add a number (for example 2) to the end of MetaTrader so that the new MT4 platform will not install itself in the same location as any other MT4 platforms on your computer. Click Next to finish the installation
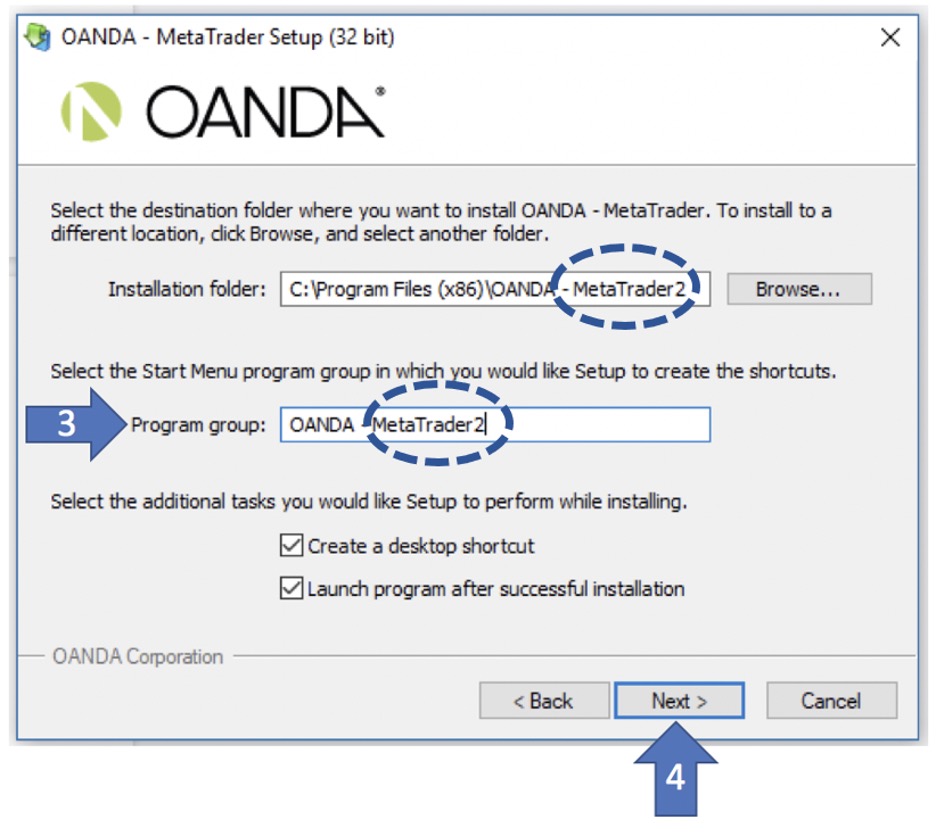
The newly installed MT4 can now be run in parallel with the previous MT4 already installed on your computer.
 Depth of market (DOM)
Depth of market is available as part of OANDA premium tools on MT4 and is viewable via the mini terminal app. You can view depth of market by clicking on the spread on the mini terminal order ticket:
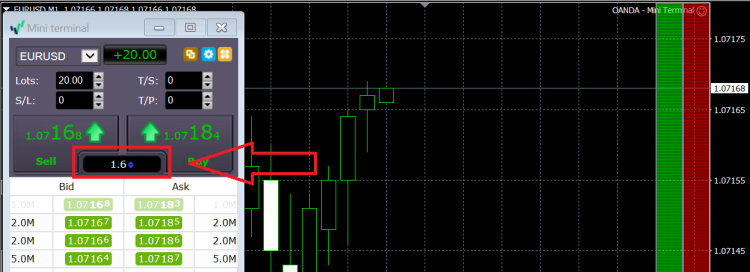
When you enter the number of lots on the mini terminal order ticket, the sell and buy prices at the top of the ticket dynamically update to show the entry/closing price and spread for the requested number of lots.
If the requested number of lots is greater than the equivalent volume available on the first level of depth, the system will look down the depth of market to calculate the entry/closing price.
After entering a number of lots greater than those available on level 1, the market depth is highlighted according to the number of lots entered.
This will show a list of prices and the number of units available at each price. If you enter an order where the number of units is greater than the number of units available on the first level (we will execute the maximum number of units available at the first level), the next portion of the order’s units over the first level price will be calculated from the subsequent price level.
This could include multiple levels, depending on the size of the order. The range of levels being used will be highlighted by the order ticket.
If the next level’s number of units is still not sufficient to fill the entire order, the process will repeat, filing down the depth of market until the entirety of the order’s number of units has been filled. If the order being submitted is larger than the total number of units available across all the price levels, the order will be rejected.
For example, if there is a first level with 1000 available units and an order for 1100 units is submitted, the first 1000 units of the order will use the first level price, while the remaining 100 units of the order will use the second level price.
This means that the price of an order filling at depth will be calculated as a Volume Weighted Average Price (or VWAP), using prices from the depth of market. Each level being used in the calculation will contribute to the order’s price, weighted by the number of units being filled at each level.